How to Make a Banner in PicMonkey

I have used PicMonkey for years. My main use for it is making banners for my posts, or resizing photos. I always used Paint Shop Pro before I found PicMonkey and although I still use it from time to time, PicMonkey is my goto for most of my tasks.
My website has a featured image size of 800 x 445 px, and when I participate in other’s giveaways their featured image is not the same size most of the time. So I am going to show you how I make their image fit mine, and also how I make a banner.
Making a New Image


When I first go to PicMonkey, I click on design (if you hover in the upper part of your screen you will see this as a choice).
- Once I have chosen the design option, I click in the 2000 area and change it to 800 (width) and 445 for the height.
- Normally I keep it a white background but if you want another color you can change this here (or opt for transparent). As seen below.

- Once you have chosen the size, background color (which you can always change later), and clicked apply you are ready to add what you would like to your banner.
- In the image above you can see where I show you what “Ours” and “Yours” means with the fonts. It is actually on “Yours”—so these are some of the fonts I have on my computer. I do use the premium version which shows as $33 a year on my account. (I just think of it as a business expense at $2.75 a month I can’t beat that myself).
- I am also explaining what the top option on the left-hand side does, as well as what the butterfly icon is for.
- Next, I want to show you how to add an image from your computer to your banner. You will want to click on the butterfly icon on the far left-hand area. Then you will see where it says at the very top to “add your own”, you will want to click that. (It will open a box to choose the image from your computer.) You can then move the image, resize it by pulling on it to the direction you want it to go.
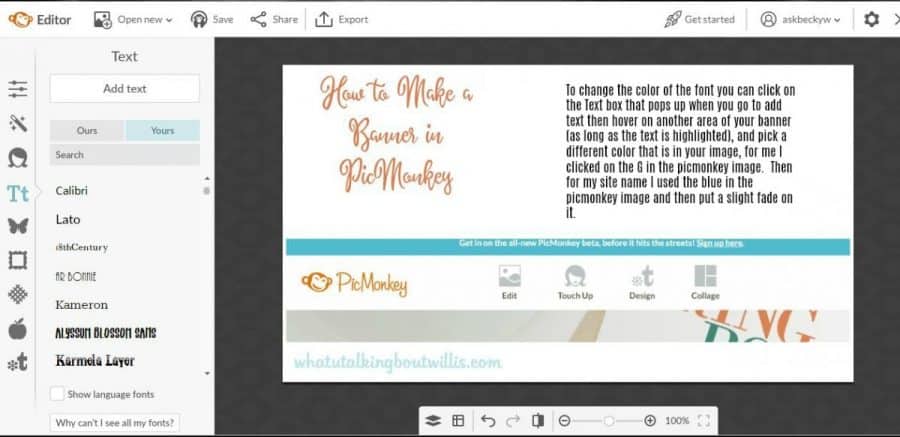
- So as you can see in the image above. I changed the title of the banner’s font color to the color of the G in the Picmonkey image that I added. I did this by clicking on the Tt option on the far left side (above the butterfly), then clicked on my layer that says “How to Make a Banner in PicMonkey”. Then if you click in the color area of your Text color palette, you will be able to pick a color in another image to use to compliment your text color. I then chose the blue in the PicMonkey image to put my site URL in the lower left-hand area, then put a slight fade on it.
- You can add more than one image to your banner, that is up to you how many images you will want. There are options to move one of your overlays to the front or to the back if you want it to sit behind another image. Also be aware if an image you put as an overlay is on a white or another color background you have to make sure they aren’t on top of each other or one will overlap the other. This is why I try to use images that are on a transparent background BUT if I can’t I just don’t put them right beside each other.


What's Your Reaction?
Excited
0
Happy
0
In Love
0
Not Sure
0
Silly
0

